spring Boot之Environment

      Spring Boot是现在实现微服务最基础,最受欢迎的一个Spring开发框架,其本身拥有Spring的全部功能,并且提供了很多特性和功能来简化开发人员的开发,深受喜欢,我也是其忠实粉丝之一。

      如果你问我你为什么会喜欢使用这个框架,我不会告诉你它有如下的优势,我会喜欢看着你写着一大堆的XML配置,哈哈哈……。

Spring Boot优势

  • 大量的自动配置,开发人员不需要配置一大堆的XML模版文件,简化开发。
  • 内嵌的Servlet服务器,不需要部署Web应用时还需要部署Tomcat、Jetty等应用服务器才能使用。
  • 提供了大量的启动依赖,开发人员不需要考虑版本冲突,依赖相关问题。
  • 提供了Spring actuator等组件,便于监控和管理应用信息。
  • 其本身可以和Spring Cloud等框架完美结合,不需要过多的配置等。

      在了解了Spring Boot框架各种优势之后,自己也使用了很长一段时间的Spring Boot框架,但是有时会报一些奇奇怪怪的问题,自己又不知道从何下手,所以下定决心要认真好好学习学习Spring Boot框架,了解其内部的实现机制,掌握原理和发现它代码写的好的地方,希望能够在开发的道路走远一点。

Spring Boot启动流程

Spring Boot启动流程图
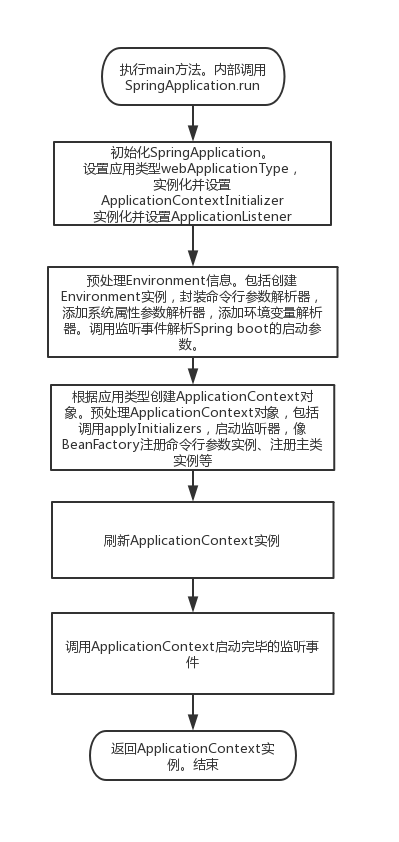
      上述便是ApplicationContext的启动大体流程,大体流程看起来相对比较简单,但其实内部做了很多操作,接下来我们就按照上述流程一一分析Spring Boot的启动流程都做了什么,其中还包括了Spring的相关知识和源码。

SpringApplication.run(Class clzz,args)

1
2
3
4
5
6
7
8
@SpringBootApplication
public class ArcherApplication {

public static void main(String[] args) {
System.setProperty("es.set.netty.runtime.available.processors", "false");
SpringApplication.run(ArcherApplication.class, args);
}
}

      上述方法便是我们使用Spring Boot时的启动方法,@SpringBootApplication注解是Spring Boot框架中最为重要的一个注解,它融合了许多注解的功能,具体的源码如下。

1
2
3
4
5
6
7
8
9
10
11
12
13
14
15
16
17
18
19
20
21
22
23
24
25
26
27
28
@Target(ElementType.TYPE)
@Retention(RetentionPolicy.RUNTIME)
@Documented
@Inherited
@SpringBootConfiguration
@EnableAutoConfiguration
@ComponentScan(excludeFilters = {
@Filter(type = FilterType.CUSTOM, classes = TypeExcludeFilter.class),
@Filter(type = FilterType.CUSTOM,
classes = AutoConfigurationExcludeFilter.class) })
public @interface SpringBootApplication {

//表示该注解相当于EnableAutoConfiguration的exclude属性
@AliasFor(annotation = EnableAutoConfiguration.class)
Class<?>[] exclude() default {};

//表示该注解相当于EnableAutoConfiguration的excludeName属性
@AliasFor(annotation = EnableAutoConfiguration.class)
String[] excludeName() default {};

//表示该注解相当于ComponentScan的basePackages属性
@AliasFor(annotation = ComponentScan.class, attribute = "basePackages")
String[] scanBasePackages() default {};

//表示该注解相当于ComponentScan的basePackageClasses属性
@AliasFor(annotation = ComponentScan.class, attribute = "basePackageClasses")
Class<?>[] scanBasePackageClasses() default {};
}

      上述代码可以看出SpringBootApplication融合@SpringBootConfiguration,@EnableAutoConfiguration,@ComponentScan的注解功能,因此SpringBootApplication注解所包含的功能如下:

  • @SpringBootConfiguration拥有@Configuration注解,因此可以用于配置类,被该注解修饰的类可以被AnnotationConfigApplicationContext等ApplicationContext类进行扫描并注入到BeanFactory中。
  • @EnableAutoConfiguration注解中有两个非常重要的注解@Import(AutoConfigurationImportSelector.class)和@Import(AutoConfigurationPackages.Registrar.class)注解,AutoConfigurationImportSelector可以实现扫描spring.factories中的XXXXAutoConfiguration类到BeanFactory中,AutoConfigurationPackages.Registrar可以实现将ImportRegistar接口的类注入到BeanFactory中。
  • ComponentScan注解可以扫描指定的路径中被声明的类到BeanFactory中。

      了解了SpringBootApplication注解,我们继续看Spring Boot的启动入口SpringApplication.run()方法,ApplicationContext实例化,自动配置类的注入都是在该方法中实现,源码如下:

1
2
3
4
5
6
7
8
9
10
11
12
13
14
15
16
17
18
19
public static ConfigurableApplicationContext run(Class<?> primarySource,
String... args) {
return run(new Class<?>[] { primarySource }, args);
}
public static ConfigurableApplicationContext run(Class<?>[] primarySources,
String[] args) {
return new SpringApplication(primarySources).run(args);
}
//实例化SpringApplication。负责给SpringApplication的primarySources、webApplicationType、初始化ApplicationContextInitializer,初始化监听器等。
public SpringApplication(ResourceLoader resourceLoader, Class<?>... primarySources) {
this.resourceLoader = resourceLoader;
Assert.notNull(primarySources, "PrimarySources must not be null");
this.primarySources = new LinkedHashSet<>(Arrays.asList(primarySources));
this.webApplicationType = WebApplicationType.deduceFromClasspath();
setInitializers((Collection) getSpringFactoriesInstances(
ApplicationContextInitializer.class));
setListeners((Collection) getSpringFactoriesInstances(ApplicationListener.class));
this.mainApplicationClass = deduceMainApplicationClass();
}

      SpringApplication提供了静态的run方法调用,run方法内部实例化SpringApplication对象,实例化SpringApplication构造函数主要做了设置Spring Boot当前的应用类型,实例化ApplicationContextInitializer,实例化ApplicationListener,这个几个SpringApplication在之后的方法中非常的重要,我们在介绍后续的方法之前,先了解下这个属性都有什么内容。首先是webApplicationType属性:

webApplicationType
1
2
3
4
5
6
7
8
9
10
11
12
13
14
15
16
17
18
19
20
21
22
23
24
25
26
27
28
29
//静态常量,标识是否是
private static final String[] SERVLET_INDICATOR_CLASSES = { "javax.servlet.Servlet",
"org.springframework.web.context.ConfigurableWebApplicationContext" };

private static final String WEBMVC_INDICATOR_CLASS = "org.springframework."
+ "web.servlet.DispatcherServlet";

private static final String WEBFLUX_INDICATOR_CLASS = "org."
+ "springframework.web.reactive.DispatcherHandler";
private static final String JERSEY_INDICATOR_CLASS = "org.glassfish.jersey.servlet.ServletContainer";

//获取工程的应用类型
static WebApplicationType deduceFromClasspath() {

//如果类中存在如下的类名,则表示是交互web应用类型
if (ClassUtils.isPresent(WEBFLUX_INDICATOR_CLASS, null)
&& !ClassUtils.isPresent(WEBMVC_INDICATOR_CLASS, null)
&& !ClassUtils.isPresent(JERSEY_INDICATOR_CLASS, null)) {
return WebApplicationType.REACTIVE;
}
//如果不包含拥有ConfigurationWebApplicationContext类,则表示不是web应用类型
for (String className : SERVLET_INDICATOR_CLASSES) {
if (!ClassUtils.isPresent(className, null)) {
return WebApplicationType.NONE;
}
}
//否则返回ServletWeb应用类型。
return WebApplicationType.SERVLET;
}

      决定Spring Boot的应用类型,主要是根据类路径中是否含有特定的类来决定,像我们创建web工程时,会在pom.xml中使用spring-boot-starter-web的依赖,这个依赖中会包含ConfigurableWebApplicationContext类,因此会返回WebApplicationType.SERVLET类型。WebApplicationType.NONE代表的该工程不是web应用。WebApplicationType.REACTIVE表示该工程是响应式web应用,返回该应用类型的条件是pom.xml中含有spring-boot-starter-webflux的依赖,截止到目前还没有使用过该依赖,所以先不在这里介绍这种应用类型。我们经常使用到的是WebApplicationType.SERVLET应用类型,所以之后的代码分析都是以WebApplicationType.SERVLET类型作为基础分析。

ApplicationContextInitializer

      分析了Spring Boot工程的应用类型,紧接着SpringApplication会设置ApplicationContextInitializer,其作用主要是在ApplicationContext创建之后,对ApplicationContext添加相应的功能。之前在介绍SpringApplication构造方法时,看到了使用getSpringFactoriesInstances方法来实例化ApplicationContextInitializer的相应实现类,getSpringFactoriesInstances的调用方法如下:

1
2
3
4
5
6
7
8
9
10
11
12
13
14
15
16
17
18
19
20
21
22
23
24
25
26
27
28
29
30
31
32
33
34
35
36
37
38
39
40
41
private <T> Collection<T> getSpringFactoriesInstances(Class<T> type) {
return getSpringFactoriesInstances(type, new Class<?>[] {});
}

private <T> Collection<T> getSpringFactoriesInstances(Class<T> type,
Class<?>[] parameterTypes, Object... args) {
//获取类加载器
ClassLoader classLoader = getClassLoader();
//该方法主要获取类路径下spring.factories文件中的相应类配置。这里是获取ApplicationContextInitializer的配置
Set<String> names = new LinkedHashSet<>(
SpringFactoriesLoader.loadFactoryNames(type, classLoader));
//实例化上述所获取到的实现类
List<T> instances = createSpringFactoriesInstances(type, parameterTypes,
classLoader, args, names);
//对上述实例化后的对象使用AnnotationAwareOrderComparator进行排序。
AnnotationAwareOrderComparator.sort(instances);
return instances;
}

//实例化。主要采用java.reflect包下相关方法进行实例化。
@SuppressWarnings("unchecked")
private <T> List<T> createSpringFactoriesInstances(Class<T> type,
Class<?>[] parameterTypes, ClassLoader classLoader, Object[] args,
Set<String> names) {
List<T> instances = new ArrayList<>(names.size());
for (String name : names) {
try {
Class<?> instanceClass = ClassUtils.forName(name, classLoader);
Assert.isAssignable(type, instanceClass);
Constructor<?> constructor = instanceClass
.getDeclaredConstructor(parameterTypes);
T instance = (T) BeanUtils.instantiateClass(constructor, args);
instances.add(instance);
}
catch (Throwable ex) {
throw new IllegalArgumentException(
"Cannot instantiate " + type + " : " + name, ex);
}
}
return instances;
}

      上边代码有一个非常重要的方法SpringFactoriesLoader.loadFactoryNames(type, classLoader)),这段方法主要是加载classLoader类路径下的spring.factories文件的相应的type配置,这里对这个方法不做过多的解释,想了解更多的可以自己看下源码。上述代码我们想要获取的是ApplicationContextInitializer的配置,我摘取了spring-boot路径下spring.factories关于ApplicationContextInitializer的配置,当然其它路径也存在关于ApplicationContextInitializer的配置,大家如果在IDEA工具中,可以使用ctrl+h来全局查找,这里只介绍下spring-boot路径下spring.factories关于ApplicationContextInitializer的作用。

1
2
3
4
5
org.springframework.context.ApplicationContextInitializer=\
org.springframework.boot.context.ConfigurationWarningsApplicationContextInitializer,\
org.springframework.boot.context.ContextIdApplicationContextInitializer,\
org.springframework.boot.context.config.DelegatingApplicationContextInitializer,\
org.springframework.boot.web.context.ServerPortInfoApplicationContextInitializer
  • ConfigurationWarningsApplicationContextInitializer: 主要是向BeanFactory中添加ConfigurationWarningsPostProcessor工厂后置处理器,这个类会在ApplicationContext.refresh()方法中使用到,在介绍到refresh方法时再做具体介绍。
  • ContextIdApplicationContextInitializer:这个初始化类比较简单,主要设置ApplicationContext的Id属性并注册ContextId的单例Bean。
  • DelegatingApplicationContextInitializer:该初始化类主要作用是获取Environment中是否含有“context.initializer.classes”属性,如果存在,则获取其值并继续调用其初始化方法。通过该类用户可以添加自定义的初始化功能,用户实现ApplicationContextInitializer接口,然后通过System.setProperty(“context.initializer.classes”, XXX)来设置,之后在启动Spring Boot应用是就可以在该类中调用到用户自定义的初始化方法。
  • ServerPortInfoApplicationContextInitializer:该类主要用作添加WebServerInitializedEvent事件类型的监听器,该监听器的作用是获取webServer启动时的端口,然后将其设置到Environment的参数中。

      上述便是一部分ApplicationContextInitializer的功能,其中个人认为比较重要的第二点和第三点,第二点我们可以知道ApplicationContext是何时设置了Id属性,第三点通过该初始化类我们了解到用户可以自实现ApplicationContextInitializer的功能并应用到Spring Boot启动中。

ApplicationListener

      在实例化ApplicationContextInitializer的相关配置类之后,紧接着SpringApplication会实例化ApplicationListener监听类。Spring Boot中的ApplicationListener监听了多种类型的事件,包括ContextRefreshedEvent(应用上下文刷新事件)、ApplicationEnvironmentPreparedEvent(Environment预处理完成事件)、ParentContextAvailableEvent(父应用上下文可用事件)以及ApplicationEvent(事件顶层接口)等事件。ApplicationListener的实现众多,在spring.boot路径下就含有9个实现,当然其它的类路径下还有很多实现,我这里之列出了spring.boo路径下相关的9的个实现。

1
2
3
4
5
6
7
8
9
10
org.springframework.context.ApplicationListener=\
org.springframework.boot.ClearCachesApplicationListener,\
org.springframework.boot.builder.ParentContextCloserApplicationListener,\
org.springframework.boot.context.FileEncodingApplicationListener,\
org.springframework.boot.context.config.AnsiOutputApplicationListener,\
org.springframework.boot.context.config.ConfigFileApplicationListener,\
org.springframework.boot.context.config.DelegatingApplicationListener,\
org.springframework.boot.context.logging.ClasspathLoggingApplicationListener,\
org.springframework.boot.context.logging.LoggingApplicationListener,\
org.springframework.boot.liquibase.LiquibaseServiceLocatorApplicationListener
  • ClearCachesApplicationListener:主要监听ContextRefreshedEvent事件,作用是在SpringApplication执行完prepareContext之后,清空ReflectionUtils中的缓存和调用ClassLoader类中的clearCache方法。
  • ParentContextCloserApplicationListener:
  • FileEncodingApplicationListener:主要监听ApplicationEnvironmentPreparedEvent事件,作用是在SpringApplication中创建了Environment之后检查environment是否含有属性“spring.mandatory-file-encoding”,若含有则判断是否和系统属性file.encoding是否相等,若不一致,则抛出IllegalStateException。
  • AnsiOutputApplicationListener:
  • ConfigFileApplicationListener:这个监听类很重要,主要监听了ApplicationEnvironmentPreparedEvent和ApplicationPreparedEvent。ApplicationEnvironmentPreparedEvent事件会将Spring Boot中的application.yml和application.properties加载到Environment中,并且设置其默认的和活跃的profiles,ApplicationEnvironmentPreparedEvent这个事件类型会在”Enviroment的相关操作”详细介绍,这里先了解下。ApplicationPreparedEvent主要是添加PropertySourceOrderingPostProcessor工厂后置处理器。
  • DelegatingApplicationListener:改监听类的作用和上一小节所用DelegatingApplicationContextInitializer很相似,主要用作执行用户自定以的ApplicationListener事件,可以通过System.setProperty(“context.listener.classes”, XXXX)实现。
  • ClasspathLoggingApplicationListener: 主要用于监听ApplicationEnvironmentPreparedEvent和ApplicationFailedEvent事件,作用是打印想过的日志。
  • LoggingApplicationListener:初始化Logger相关配置。
  • LiquibaseServiceLocatorApplicationListener:

      从上边可以看出SpringBoot中ApplicationListener还是非常多的,而且承担着非常重要的作用,这也在某些点上体现了Spring Boot设计的优点,就是单一职责的原则(即一个类应只有一个改变它的原因)。ApplicationListener中最为重要的是ConfigFileApplicationListener,这个会在后续的章节介绍,其它的ApplicationListener都承担着自己不同的使命,大家可以自己详细看下源码,这样掌握的会更清晰一些。
      SpringApllication的实例化到这里就讲完了,我们知道SpringApplication的实例化主要做了4个事情:第一个是确定应用类型WebAppliType,第二个是初始化ApplicationContextInitlize,第三个是初始化ApplictionListener,第四个是设置主类。在之前的SpringApplication.run(Class clazz, String… arg)我们看到最后还调用了run(String… arg)方法,这个方法是SpringApplication最重要的方法,包括参数加载,ApplicationContext创建都是在这个方法内,所以接下来我们详细看new SpringApplication.run()方法。

SpringApplication.run(String… arg)
args)
1
2
3
4
5
6
7
8
9
10
11
12
13
14
15
16
17
18
19
20
21
22
23
24
25
26
27
28
29
30
31
32
33
34
35
36
37
38
39
40
41
42
43
44
45
46
47
48
49
50
51
52
53
54
55
56
57
58
59
60
61
62
63
64
65
public ConfigurableApplicationContext run(String... args) {
//类似于一个调度监控器,监控什么时候开始记录信息,什么时候结束记录信息
StopWatch stopWatch = new StopWatch();
stopWatch.start();
ConfigurableApplicationContext context = null;
Collection<SpringBootExceptionReporter> exceptionReporters = new ArrayList<>();
//设置Spring Boot在没有鼠标、显示器、键盘的情况下也允许启动。Spring Boot大多都工作在该模式下,因此应该将这该属性设置为true。
configureHeadlessProperty();
//获取SPringApplication监听器的运行实例,在代码中实例化了事件广播器,因此我觉得这个就是一个事件广播器的适配器模式。
SpringApplicationRunListeners listeners = getRunListeners(args);
//事件广播器发送启动事件
listeners.starting();
try {
//封装命令行参数
ApplicationArguments applicationArguments = new DefaultApplicationArguments(
args);
//获取并设置相应的运行环境,这个很重要。可以通过enviroment获取到启动参数
ConfigurableEnvironment environment = prepareEnvironment(listeners,
applicationArguments);
//是否跳过搜索BeanInfo类
configureIgnoreBeanInfo(environment);
//这个就是我们常看到的在控制台上Spring Boot的输出,我们可以实现该接口,重写其方法来设置输出结果
Banner printedBanner = printBanner(environment);
//创建应用ApplicationContext
context = createApplicationContext();
exceptionReporters = getSpringFactoriesInstances(
SpringBootExceptionReporter.class,
new Class[] { ConfigurableApplicationContext.class }, context);
//预处理ApplicationContext对象
prepareContext(context, environment, listeners, applicationArguments,
printedBanner);
//调用ApplicationContext的refresh方法
refreshContext(context);
afterRefresh(context, applicationArguments);
stopWatch.stop();
if (this.logStartupInfo) {
new StartupInfoLogger(this.mainApplicationClass)
.logStarted(getApplicationLog(), stopWatch);
}
//广播启动结束事件
listeners.started(context);
callRunners(context, applicationArguments);
}
catch (Throwable ex) {
handleRunFailure(context, ex, exceptionReporters, listeners);
throw new IllegalStateException(ex);
}

try {
//广播正在运行中的事件
listeners.running(context);
}
catch (Throwable ex) {
handleRunFailure(context, ex, exceptionReporters, null);
throw new IllegalStateException(ex);
}
return context;
}

//获取spring.factories中的springApplicationRunListener配置并实例化
private SpringApplicationRunListeners getRunListeners(String[] args) {
Class<?>[] types = new Class<?>[] { SpringApplication.class, String[].class };
return new SpringApplicationRunListeners(logger, getSpringFactoriesInstances(
SpringApplicationRunListener.class, types, this, args));
}

      上边的代码看起来应该不难,但是如果一步步深入下去,你会发现其是一个非常大的工程,包括获取设置应用启动的参数解析器,创建ApplicationContext并注入相关Bean等等,其中比较重要的就是prepareEnvironment和prepareContext两个方法,这两个方法会在后续的详细章节进行介绍,在这里我们先看下整体的一个工作流程。

  1. 创建StopWatch对象,StopWatch实例主要用来记录SpringApplication的启动时间和启动完成时间,调用start()方法会记录当前时间即是启动时间,调用stop()方法记录启动使用的总时间。
  2. 调用configureHeadlessProperty()方法,主要是设置”java.awt.headless”属性,如果系统属性中不存在改配置,则默认设置为true,否则使用系统属性已配置的值。该属性的作用主要是允许SpringApplication工作在无显示器、无鼠标、无键盘的环境中。
  3. 调用getRunListeners(args)方法获取事件广播器的实例,通过查找spring.factories的SpringApplicationRunListener的实现类进行实例化并封装到SpringApplictionListeners类中,这里使用了观察者模式(即当一个对象修改时可以通知其依赖的对象)。SpringApplicationRunListener的实现类使用了适配器模式。
  4. 广播启动事件listeners.starting():Spring Boot路径下的spring.factories中只有一个支持启动事件的监听器就是LoggingApplicationListener,其主要作用根据类路径下的LoggingSystemClass来初始化日志系统。
  5. 调用new DefaultApplicationArguments(args)方法,其作用是封装命令行参数和命令行参数解析器。
  6. prepareEnvironment(listeners, applicationArguments)这个方法很重要,主要是添加启动参数解析器和设置spring.active.profiles。这个会在下个章节详细讲解。
  7. configureIgnoreBeanInfo(enviroment):是否跳过搜索BeanInfo类,暂不知道作用是什么,待之后补充。
  8. printBanner(enviroment): 这个方法就是在启动的时候打印输出Spring Boot那个图标的方法,我们可以通过springApplication.setBanner()方法添加自己的需要的输出。
  9. 创建ApplicationContext对象,根据webApplicationType创建ApplicationContext,如果是web环境,则创建的是AnnotationServletWebApplicationContext对象,其它的可以大家私下了解。
  10. prepareContext(context, environment, listeners, applicationArguments, printedBanner):预处理ApplicationContext对象,包括设置ApplicationContext的运行环境environment,调用之前说的ApplicationContextInitlize的初始方法,调用相应监听器方法等。
  11. refreshContext(context):刷新ApplicationContext,调用的则是AbstractApplicationContext的refresh()方法,这一步会实例化Spring中所有的Bean对象以及EnableConfiguration对象。
  12. 广播启动完成事件,做相应的处理。
  13. 广播正在运行事件,做相应的处理。
  14. 返回ApplicationContext对象。

      上述方法便是我们在main方法中调用了SpringApplication.run(Class clazz, String… args)方法之后Spring Boot内部都做了什么操作,上述只是介绍Spring Boot启动的整体执行流程,对于Spring Boot怎么实现自动加载,启动参数是怎么加载,Bean如何注入到Bean工厂中都为进行详细讲解,所以接下来我们就对上述这几种情况进行详细介绍,首先分析启动参数是如何加载的?

Enviroment的相关操作

1
2
3
4
5
6
7
8
9
10
11
12
13
14
15
private ConfigurableEnvironment prepareEnvironment(
SpringApplicationRunListeners listeners,
ApplicationArguments applicationArguments) {
// Create and configure the environment
ConfigurableEnvironment environment = getOrCreateEnvironment();
configureEnvironment(environment, applicationArguments.getSourceArgs());
listeners.environmentPrepared(environment);
bindToSpringApplication(environment);
if (!this.isCustomEnvironment) {
environment = new EnvironmentConverter(getClassLoader())
.convertEnvironmentIfNecessary(environment, deduceEnvironmentClass());
}
ConfigurationPropertySources.attach(environment);
return environment;
}
getOrCreateEnvironment()

      Environment是一个非常重要的组件,它代表的当前Spring Boot运行的环境,可以通过该组件配置profile和管理启动参数,上述代码便是Environment的创建和相关配置的代码,其中getOrCreateEnviroment()方法是创建Environment的,其源码如下:

1
2
3
4
5
6
7
8
9
10
11
12
13
14
private ConfigurableEnvironment getOrCreateEnvironment() {
if (this.environment != null) {
return this.environment;
}
//判断应用类型返回相应的环境变量
switch (this.webApplicationType) {
case SERVLET:
return new StandardServletEnvironment();
case REACTIVE:
return new StandardReactiveWebEnvironment();
default:
return new StandardEnvironment();
}
}

      如果在启动SpringApplication设置了Environment属性,则返回开发人员设置的Environment,否则根据应用类型返回相应的Environment实现类,我们说了我们暂只分析webApplicationType为servlet类型的,因此这里创建的是StandardServletEnviroment实例,我们可以StandardServletEnviroment的继承关系图。

StandardServletEnviroment

StandardServletEnviroment类图

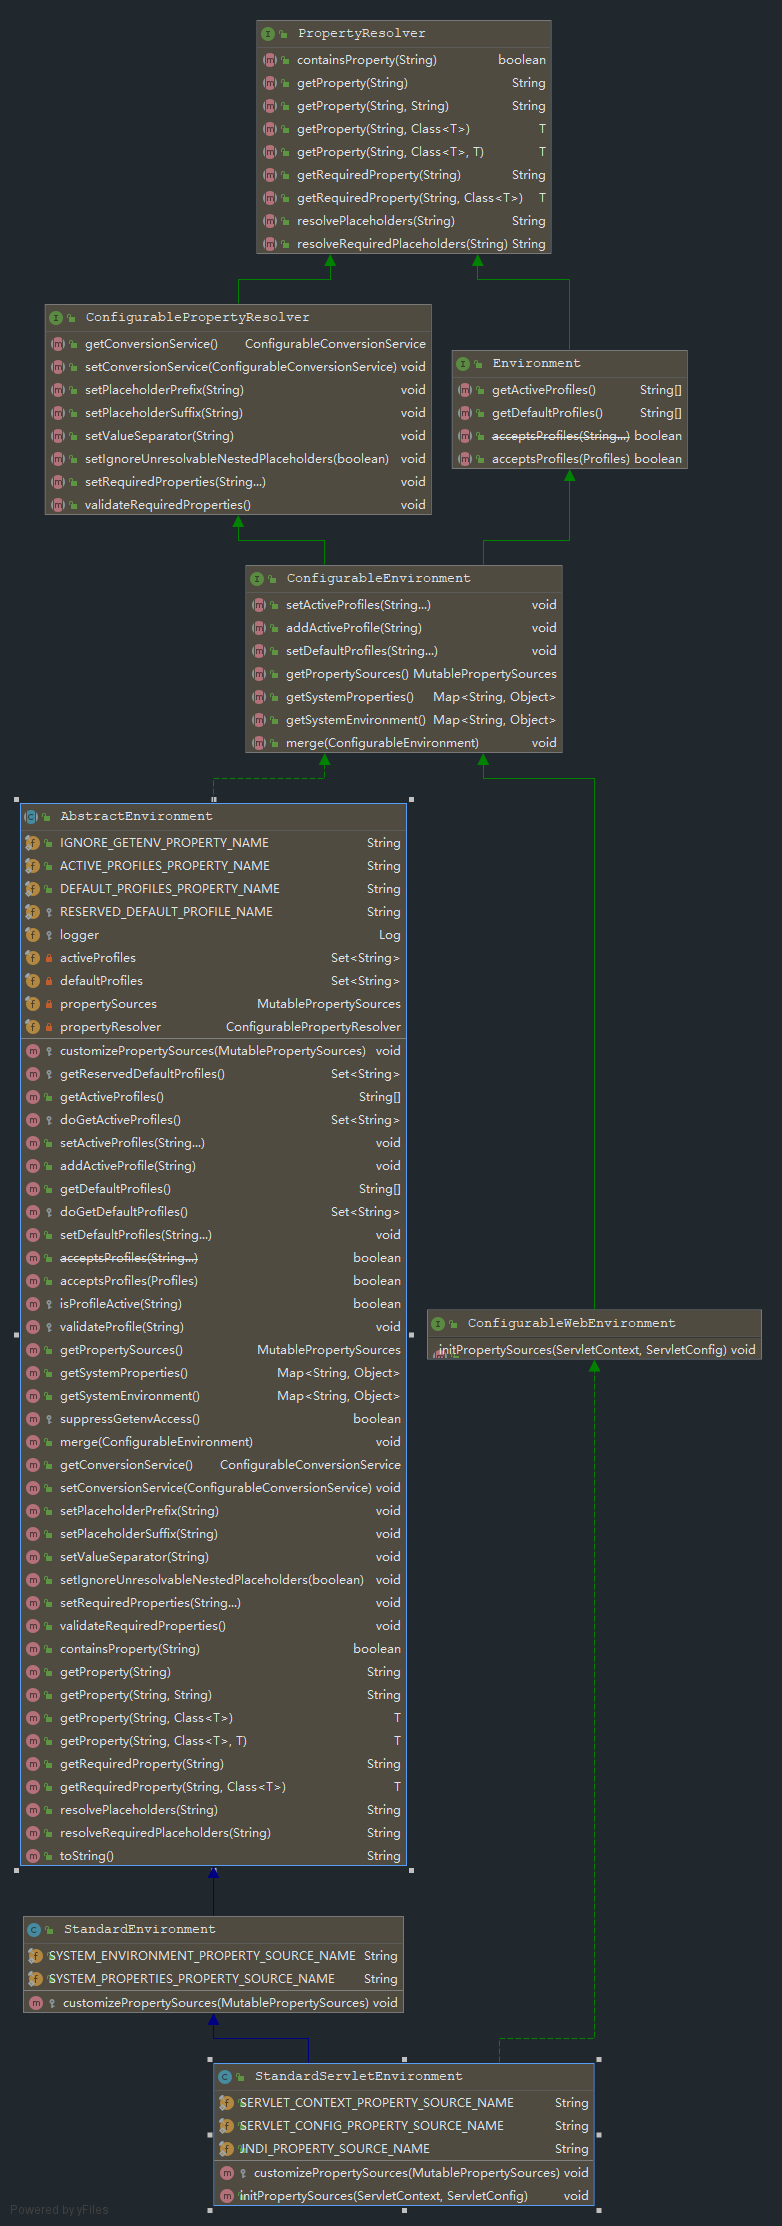
      上图便是StandardServletEnviroment的继承关系图,可以看出它拥有PropertyResolver的获取属性功能和Environment的获取profile的功能,上述各个类提供的功能如下:

  • PropertyResolver:提供属性访问的功能,这里的属性包括命令行、系统属性、系统环境变量、配置文件等提供的属性。
  • ConfigurablePropertyResolver:继承了PropertyResolver,主要提供属性类型转换的功能。
  • Environment:主要用于获取当前应用处于活动的Profile和默认的Profile。
  • ConfigurableEnvironment:提供了管理激活Profile和默认Profile功能。
  • ConfigurableWebEnvironment:主要提供了initPropertySources,用于对Servlet上下文和Servlet参数的配置功能。
  • AbstractEnvironment: 实现了ConfigurableEnvironment接口,并且提供了PropertyResolver的实现类用来获取属性。
  • StandardEnvironment:非Web应用环境下的标准Enviroment。
  • StandardServletEnviroment:集成了StandardEnvironment和实现了ConfigurableWebEnvironment接口,具有上述两个类的功能,并且实现了Environment对Servlet上下文和Servlet参数的配置功能。

      介绍了StandardServletEnviroment的实现类图,我们接着看下new StandardServletEnviroment()内部做了哪些操作,到底Spring Boot参数配置顺序是如何实现的。

1
2
3
4
5
6
7
8
9
10
11
12
13
14
15
16
17
18
19
20
21
22
23
24
25
public AbstractEnvironment() {
customizePropertySources(this.propertySources);
}

//StandardServletEnviroment的customizePropertySources方法
protected void customizePropertySources(MutablePropertySources propertySources) {
//像MutablePropertySources中添加上下文配置的PropertySource实现和Servlet参数的PropertySource
//主要作用于之后initPropertySource的处理
propertySources.addLast(new StubPropertySource(SERVLET_CONFIG_PROPERTY_SOURCE_NAME));
propertySources.addLast(new StubPropertySource(SERVLET_CONTEXT_PROPERTY_SOURCE_NAME));
if (JndiLocatorDelegate.isDefaultJndiEnvironmentAvailable()) {
propertySources.addLast(new JndiPropertySource(JNDI_PROPERTY_SOURCE_NAME));
}
//调用父类的自定义PropertySource
super.customizePropertySources(propertySources);
}

//StandardEnvironment的customizePropertySources方法
@Override
protected void customizePropertySources(MutablePropertySources propertySources) {
//添加用于解析系统属性的MapPropertySource类
propertySources.addLast(new MapPropertySource(SYSTEM_PROPERTIES_PROPERTY_SOURCE_NAME, getSystemProperties()));
//添加用于解析系统环境变量SystemEnvironmentPropertySource类
propertySources.addLast(new SystemEnvironmentPropertySource(SYSTEM_ENVIRONMENT_PROPERTY_SOURCE_NAME, getSystemEnvironment()));
}

      StandardServletEnviroment本身只提供了默认的构造方法,但是我们知道子类要初始化若父类未初始化,需要首先初始化父类,因此我们看到在AbstractEnvironment类中调用了customizePropertySources方法,StandardServletEnviroment重写了customizePropertySources方法,其目的如下:

  • 向Environment添加了应用上下文ServletContext启动参数和Servlet启动参数的解析类StubPropertySource,StubPropertySource是一个默认返回空的属性解析类,主要是其占位符的作用,为后续的initPropertySource做预处理。
  • 添加用于解析java:comp/env的JNDI属性配置的JndiPropertySource类
  • 调用父层StandardEnviroment的customizePropertySources方法
  • 添加用于解析系统属性的MapPropertySource类。
  • 添加用于解析系统环境变量的SystemEnvironmentPropertySource的类。
configureEnvironment(ConfigurableEnvironment,String[])

      通过上述的分析,我们可以清楚的发现其和Spring Boot的配置文件加载优先级很相似,但是好像缺少了几个非常重要的配置文件解析,包括命令行解析,yaml文件的解析和properties文件的解析都没有。不着急,我们才只分析到prepareEnviroment的第一个方法,等分析完这个方法你就会发现其它几个属性解析类,也会添加到其中。我们继续分析prepareStatement中的调用方法,创建好StandServletEnviroment对象之后,会调用configureEnviroment(environment, applicationArguments.getSourceArgs()), 源码如下:

1
2
3
4
5
6
7
8
9
10
11
12
13
14
15
16
17
18
19
20
21
22
23
24
25
26
27
28
29
30
31
32
33
34
35
36
37
38
39
40
41
42
43
44
45
46
47
48
49
50
51

//设置Environment的相关属性
protected void configureEnvironment(ConfigurableEnvironment environment,
String[] args) {
if (this.addConversionService) {
ConversionService conversionService = ApplicationConversionService
.getSharedInstance();
environment.setConversionService(
(ConfigurableConversionService) conversionService);
}
configurePropertySources(environment, args);
configureProfiles(environment, args);
}

//设置属性来源解析器,这里主要的设置是命令行参数源解析器
protected void configurePropertySources(ConfigurableEnvironment environment,
String[] args) {
MutablePropertySources sources = environment.getPropertySources();
//判断是否使用SpringApplication的实例设置defaultPropertie属性,若设置将其放在参数解析器链最后
if (this.defaultProperties != null && !this.defaultProperties.isEmpty()) {
sources.addLast(
new MapPropertySource("defaultProperties", this.defaultProperties));
}
//判断是否启用命令行参数,默认为true并判断命令行参数的大小是否大于0.
if (this.addCommandLineProperties && args.length > 0) {
//判断是否存在相同的参数解析器,若果存在就合并并替换掉MutablePropertySources的相同名称的参数解析器
String name = CommandLinePropertySource.COMMAND_LINE_PROPERTY_SOURCE_NAME;
if (sources.contains(name)) {
PropertySource<?> source = sources.get(name);
CompositePropertySource composite = new CompositePropertySource(name);
composite.addPropertySource(new SimpleCommandLinePropertySource(
"springApplicationCommandLineArgs", args));
composite.addPropertySource(source);
sources.replace(name, composite);
}
else {
//创建命令行参数解析器并添加到MutablePropertySources的首部。
sources.addFirst(new SimpleCommandLinePropertySource(args));
}
}
}

//设置SpringApplication当前使用的Profile
protected void configureProfiles(ConfigurableEnvironment environment, String[] args) {
//获取环境中存在的使用的Profile,这个主要是通过命令行、系统属性、环境变量来读取的Spring.active.profiles方法
environment.getActiveProfiles(); // ensure they are initialized
//添加SpringApplication中的additionalProfiles属性的Profile配置
Set<String> profiles = new LinkedHashSet<>(this.additionalProfiles);
profiles.addAll(Arrays.asList(environment.getActiveProfiles()));
environment.setActiveProfiles(StringUtils.toStringArray(profiles));
}

      上述的代码主要设置命令行参数解析器,并将其添加到命令行解析器链MutablePropertySources的首部。然后是调用configureProfiles方法来设置使用的Profile,可能会有疑问为什么要先获取environment的ActiveProfiles,这里如果按照之前的逻辑来说的话,应该是返回的空或者时空集合,但是在之前我们也说过可以通过命令行参数、系统属性、环境变量等设置,所以这里可能通过命令行等其他方面设置了,所以需要将其添加到环境中。

listeners.environmentPrepared(environment)

      命令行参数解析器在configureEnvironment方法中会添加到首部,所以命令行参数解析器的优先级是最高的,但是还没有分析yaml和properties的解析,yaml文件的解析和properties的参数解析是在监听器中进行加载的,所以我们继续看接下来的方法listeners.environmentPrepared(environment)。listeners.environmentPrepared(environment)会向监听器发送一个ApplicationEnvironmentPreparedEvent事件,在之前的讲解中,我们讲了在SpringApplication中加载的监听器中FileEncodingApplicationListener、AnsiOutputApplicationListener、ConfigFileApplicationListener、监听了ApplicationEnvironmentPreparedEvent事件,因此我们按照上述的监听器分析下都做了什么操作?

FileEncodingApplicationListener
1
2
3
4
5
6
7
8
9
10
11
12
13
14
15
16
17
18
19
20
21
22
23
24
25
26
27
28
29
30
31
32
33
34
35
36
37
38
39
    public class FileEncodingApplicationListener
implements ApplicationListener<ApplicationEnvironmentPreparedEvent>, Ordered {

private static final Log logger = LogFactory
.getLog(FileEncodingApplicationListener.class);

@Override
public int getOrder() {
return Ordered.LOWEST_PRECEDENCE;
}

/**
* 判断系统属性、命令行参数、系统环境变量是否存在spring.mandatory-file-encoding
* 判断spring.mandatory-file-encoding的值和系统属性中file.encoding设置的值一致,若不一致,则抛出异常.
* /
@Override
public void onApplicationEvent(ApplicationEnvironmentPreparedEvent event) {
ConfigurableEnvironment environment = event.getEnvironment();
if (!environment.containsProperty("spring.mandatory-file-encoding")) {
return;
}
String encoding = System.getProperty("file.encoding");
String desired = environment.getProperty("spring.mandatory-file-encoding");
if (encoding != null && !desired.equalsIgnoreCase(encoding)) {
logger.error("System property 'file.encoding' is currently '" + encoding
+ "'. It should be '" + desired
+ "' (as defined in 'spring.mandatoryFileEncoding').");
logger.error("Environment variable LANG is '" + System.getenv("LANG")
+ "'. You could use a locale setting that matches encoding='"
+ desired + "'.");
logger.error("Environment variable LC_ALL is '" + System.getenv("LC_ALL")
+ "'. You could use a locale setting that matches encoding='"
+ desired + "'.");
throw new IllegalStateException(
"The Java Virtual Machine has not been configured to use the "
+ "desired default character encoding (" + desired + ").");
}
}
}

      FileEncodingApplicationListener监听器中实现的功能非常简单,只是校验环境是否存在spring.mandatory-file-encoding属性,若存在spring.mandatory-file-encoding属性和系统属性中的file.encoding不相同,则抛出异常。

AnsiOutputApplicationListener
1
2
3
4
5
6
7
8
9
10
11
12
13
14
15
16
17
18
19
public class AnsiOutputApplicationListener
implements ApplicationListener<ApplicationEnvironmentPreparedEvent>, Ordered {

@Override
public void onApplicationEvent(ApplicationEnvironmentPreparedEvent event) {
ConfigurableEnvironment environment = event.getEnvironment();
Binder.get(environment)
.bind("spring.output.ansi.enabled", AnsiOutput.Enabled.class)
.ifBound(AnsiOutput::setEnabled);
AnsiOutput.setConsoleAvailable(environment
.getProperty("spring.output.ansi.console-available", Boolean.class));
}

@Override
public int getOrder() {
// Apply after ConfigFileApplicationListener has called EnvironmentPostProcessors
return ConfigFileApplicationListener.DEFAULT_ORDER + 1;
}
}

      该监听器用于判断环境属性中是否存在spring.output.ansi.enabled并且值为true,若为true时,则表示彩色显示输出日志。spring.output.ansi.console-available属性用于设置是否控制台输出。

ConfigFileApplicationListener
1
2
3
4
5
6
7
8
9
10
11
12
13
14
15
16
17
18
19
20
21
22
23
24
25
26
27
28
29
30
31
32
33
34
35
36
37
38
39
40
41
42
43
44
45
46
47
48
49
50
51
52
53
54
55
56
57
58
59
60
61
62
63
64
65
66
67
68
69
70
71
72
73
74
75
76
77
78
79
80
81
82
83
84
85
86
87
88
89
90
91
92
93
94
public class ConfigFileApplicationListener
implements EnvironmentPostProcessor, SmartApplicationListener, Ordered {

private static final String DEFAULT_PROPERTIES = "defaultProperties";

private static final String DEFAULT_SEARCH_LOCATIONS = "classpath:/,classpath:/config/,file:./,file:./config/";

private static final String DEFAULT_NAMES = "application";

private static final Set<String> NO_SEARCH_NAMES = Collections.singleton(null);

private static final Bindable<String[]> STRING_ARRAY = Bindable.of(String[].class);

public static final String ACTIVE_PROFILES_PROPERTY = "spring.profiles.active";

public static final String INCLUDE_PROFILES_PROPERTY = "spring.profiles.include";

public static final String CONFIG_NAME_PROPERTY = "spring.config.name";

public static final String CONFIG_LOCATION_PROPERTY = "spring.config.location";

public static final String CONFIG_ADDITIONAL_LOCATION_PROPERTY = "spring.config.additional-location";

public static final int DEFAULT_ORDER = Ordered.HIGHEST_PRECEDENCE + 10;

private final DeferredLog logger = new DeferredLog();

private String searchLocations;

private String names;

private int order = DEFAULT_ORDER;

//判断该监听器是否监听该事件
@Override
public boolean supportsEventType(Class<? extends ApplicationEvent> eventType) {
return ApplicationEnvironmentPreparedEvent.class.isAssignableFrom(eventType)
|| ApplicationPreparedEvent.class.isAssignableFrom(eventType);
}

//监听器监听的事件触发时实现的功能
@Override
public void onApplicationEvent(ApplicationEvent event) {
//当前应用环境准备好触发的事件时调用的方法
if (event instanceof ApplicationEnvironmentPreparedEvent) {
onApplicationEnvironmentPreparedEvent(
(ApplicationEnvironmentPreparedEvent) event);
}
//当前应用上下文准备好触发的事件时调用的方法
if (event instanceof ApplicationPreparedEvent) {
onApplicationPreparedEvent(event);
}
}

//应用环境准备好触发的事件实现
private void onApplicationEnvironmentPreparedEvent(
ApplicationEnvironmentPreparedEvent event) {
//从spring.factories中获取EnvironmentProcessor的实现类
List<EnvironmentPostProcessor> postProcessors = loadPostProcessors();
//将当前的方法也添加到processors的集合中
postProcessors.add(this);
AnnotationAwareOrderComparator.sort(postProcessors);
//循环调用EnvironmentProcessor中的postProcessorEnviroment的方法
for (EnvironmentPostProcessor postProcessor : postProcessors) {
postProcessor.postProcessEnvironment(event.getEnvironment(),
event.getSpringApplication());
}
}

/**
* 从spring.factories中获取EnvironmentProcessor的实现类
* SpringFactoriesLoader是个工具类,用于获取spring.factories的相关配置并实例化其内部的配置。
* /
List<EnvironmentPostProcessor> loadPostProcessors() {
return SpringFactoriesLoader.loadFactories(EnvironmentPostProcessor.class,
getClass().getClassLoader());
}

/**
* ConfigFileApplicationListener实现了EnvironmentProcessor的类
* 在onApplicationEnvironmentPreparedEvent的方法中调用了postProcessEnvironment的方法
* 该方法用于向MultiPropertySources中添加参数解析器。
* /
@Override
public void postProcessEnvironment(ConfigurableEnvironment environment,
SpringApplication application) {
addPropertySources(environment, application.getResourceLoader());
}

private void onApplicationPreparedEvent(ApplicationEvent event) {
this.logger.switchTo(ConfigFileApplicationListener.class);
addPostProcessors(((ApplicationPreparedEvent) event).getApplicationContext());
}
}

      ConfigFileApplicationListener说过是非常重要的一个监听器,用于向当前应用环境注册properties和yaml的参数解析器,其具体实现在上述中的addPropertySources方法,我们继续看addPropertySources的源码。

1
2
3
4
5
6
7
8
protected void addPropertySources(ConfigurableEnvironment environment,
ResourceLoader resourceLoader) {
//向当前应用环境添加Random参数解析器
//SpringBoot可以配置random.int,random.long等值,可以这样配置就归功于这个PropertySource。
RandomValuePropertySource.addToEnvironment(environment);
//创建Loader实例,并且执行加载方方法,这个类用于加载yaml和properties的参数解析器
new Loader(environment, resourceLoader).load();
}
Loader.load()
1
2
3
4
5
6
7
8
9
10
11
12
13
14
15
16
17
18
19
20
21
22
23
24
25
26
27
28
29
30
31
32
33
34
35
36
37
38
39
40
41
42
43
44
45
46
47
48
49
50
51
52
53
54
55
56
57
58
59
60
61
62
63
64
65
66
67
68
69
70
71
72
73
74
75
76
77
78
79
private class Loader {
private final Log logger = ConfigFileApplicationListener.this.logger;
//当前的应用环境,ConfigurableEnvironment的实现类
private final ConfigurableEnvironment environment;
//参数占位符解析器
private final PropertySourcesPlaceholdersResolver placeholdersResolver;
//资源加载器
private final ResourceLoader resourceLoader;
//参数解析器加载类集合,用于存储类加载器
private final List<PropertySourceLoader> propertySourceLoaders;
//Profile集合类
private Deque<Profile> profiles;
//用于表示已处理过的Profile集合
private List<Profile> processedProfiles;
//
private boolean activatedProfiles;
//profile和PropertySource解析类的Map集合
private Map<Profile, MutablePropertySources> loaded;
//
private Map<DocumentsCacheKey, List<Document>> loadDocumentsCache = new HashMap<>();

//创建Loader实例
Loader(ConfigurableEnvironment environment, ResourceLoader resourceLoader) {
this.environment = environment;
this.placeholdersResolver = new PropertySourcesPlaceholdersResolver(
this.environment);
this.resourceLoader = (resourceLoader != null) ? resourceLoader
: new DefaultResourceLoader();
//用于获取spring.factories中的PropertySourceLoader的实现类并实例化。
this.propertySourceLoaders = SpringFactoriesLoader.loadFactories(
PropertySourceLoader.class, getClass().getClassLoader());
}

public void load() {
this.profiles = new LinkedList<>();
this.processedProfiles = new LinkedList<>();
this.activatedProfiles = false;
this.loaded = new LinkedHashMap<>();
//判断当前应用环境是否存在spring.active.profile或存在spring.include.profile,若过不存在则返回一个默认的profile。
initializeProfiles();
//判断是profiles集合是否为空,若不为空则,则加载默认的Profile或者活跃的Profile。将其的参数解析器添加到当前应用环境中
while (!this.profiles.isEmpty()) {
Profile profile = this.profiles.poll();
if (profile != null && !profile.isDefaultProfile()) {
addProfileToEnvironment(profile.getName());
}
//加载配置文件到当前应用环境中。
load(profile, this::getPositiveProfileFilter,
addToLoaded(MutablePropertySources::addLast, false));
//将当前的profile加载到已处理的profiles集合
this.processedProfiles.add(profile);
}
resetEnvironmentProfiles(this.processedProfiles);
//添加那些不是当前环境支持活跃的Profile
load(null, this::getNegativeProfileFilter,
addToLoaded(MutablePropertySources::addFirst, true));
addLoadedPropertySources();
}

//初始化Profiles,获取当前应用环境的profile
private void initializeProfiles() {
// The default profile for these purposes is represented as null. We add it
// first so that it is processed first and has lowest priority.
this.profiles.add(null);
//获取当前应用环境Profile的集合,即判断系统属性和环境变量中是否有spring.active.profiles或是spring.include.profiles属性。
Set<Profile> activatedViaProperty = getProfilesActivatedViaProperty();
this.profiles.addAll(getOtherActiveProfiles(activatedViaProperty));
// Any pre-existing active profiles set via property sources (e.g.
// System properties) take precedence over those added in config files.
addActiveProfiles(activatedViaProperty);
//如果当前的profiles的数量为1,即为null。则创建默认的profile实例。
if (this.profiles.size() == 1) { // only has null profile
for (String defaultProfileName : this.environment.getDefaultProfiles()) {
Profile defaultProfile = new Profile(defaultProfileName, true);
this.profiles.add(defaultProfile);
}
}
}
}

      上述是创建获取配置文件实例的方法,构造函数Loader(ConfigurableEnvironment environment, ResourceLoader resourceLoader)包括设置当前应用环境、参数占位符解析器、资源加载器以及从spring.factories中获取PropertySourceLoader实现类。创建Loader类之后,会紧随调用load()方法,load方法实现比较复杂,这里先罗列下load()方法的整体流程,然后在细看其中的方法,整体流程如下:

  1. initializeProfiles(): 初始化profiles,并添加必要的Profile实例。
  2. 遍历profiles集合列表,然后对其中的每个profile做处理,首先是对空的profile进行处理,获取配置的文件路径集合,spring.config.location若未指定时则返回默认的路径(classpath:/,classpath:/config/,file:/,file:/config/)下的文件,spring.config.name指定了文件的名称,若未指定时返回的是application。
  3. 遍历上述的配置文件并加载转换为Document,然后获取其中的spring.profiles.active和spring.profiles.include属性的值,并将其加载到profiles中,并将配置文件封装为一个propertySource实现类添加到loaded中。
  4. 继续获取profiles列表的值,例如我们上述指定spring.profiles.active=dev,那么会加载上述路径下application-dev.properties/application-dev.yml文件,并将其添加封装为propertySource的实现类,添加到Loader类的loaded属性中。
  5. addLoadedPropertySources():方法是将loaded集合反向,然后将其中propertySource值添加到当前应用环境的MutablePropertySources的中。

小结

      Environment是在Spring Boot占据着举足轻重的作用,ApplicationContext在启动的时候都是从Environment中获取属性值,在之前的分析中,我们讲了Environment是怎样加载参数的,在这里再总体的介绍下:

  • 创建Environment实现类,web应用一般创建的是StandServletEnviroment,会调用父类的customerProperties方法,在这里会加载系统属性来源类和系统环境变量来源类到当前应用环境Enviroment的propertySources属性中。
  • 调用ConfigureEnviroment方法,会将命令行启动参数封装为MapPropertySource添加到应用环境Enviroment的propertySources属性中,并且会放置到首部。
  • 调用监听器的当前应用环境准备好事件,会触发ConfigFileApplicationListener的事件,来加载配置文件的属性来源类到应用环境Enviroment的propertySources属性中,放置在末尾。
  • 在ApplicationContext刷新时,会调用BeanFactoryPostProcessor的实现类-PropertySourceOrderingPostProcessor,该处置类会将当前应用环境的defaultProperties的属性来源解析类调整到最后。

      Spring Boot简化了开发人员的许多工作,但是只有掌握了Spring Boot的实现原理才能更好地使用Spring Boot做相应的开发,例如携程的Apollo的配置中心便用到了Environment的许多实现,因此掌握了Spring Boot便可以更好地使用他人的框架以及开发出适合自己业务系统的框架。

      之前说过每写完一篇文章都会分享一个自己觉得不错句子,可能是歌词,可能是评论,可能是电影的对白,带给你的可能是感动,伤心、开心等等。不管你怎么想,我就是想分享,所以今天的分享话语是……

      “原来我很快乐,只是不愿承认”

--《我们》歌词